AI Setup with the MCP Server
The node-auth MCP server gives any MCP-capable AI editor direct access to the library's documentation, interfaces, and code-generation tools. Instead of copying snippets from docs, you describe what you need in plain language and the AI scaffolds the full implementation.
Verified working editors: VS Code (GitHub Copilot), Cursor, Windsurf, Claude Desktop, and Antigravity.
The MCP server is a hosted service — there is nothing to install locally. You only need to:
- Create an API key in your account area
- Paste the connection config into your editor
Step 1 — Create an API key
Open your Account page and go to the 🔑 API Keys tab.
Click + Generate Key, give the key a name (e.g. VS Code Token), select the mcp:read scope, and click Generate Key.
Copy the raw key immediately — it is shown only once.
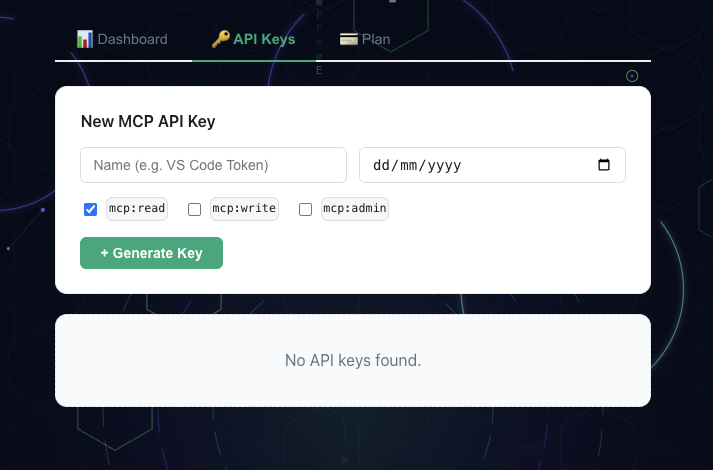
Account area — create and copy your MCP API key
Step 2 — Connect your editor
- VS Code
- Cursor
- Windsurf
- Claude Desktop
- Antigravity
Create .vscode/mcp.json in your project root (or open an existing one) and add:
{
  "servers": {
    "awesome-node-auth": {
      "type": "http",
      "url": "https://mcp.awesomenodeauth.com/mcp",
      "headers": {
        "Authorization": "Bearer YOUR_API_KEY"
      }
    }
  }
}
Replace YOUR_API_KEY with the key you copied in Step 1.
Restart VS Code. Copilot Chat will now list node-auth as a connected MCP server.
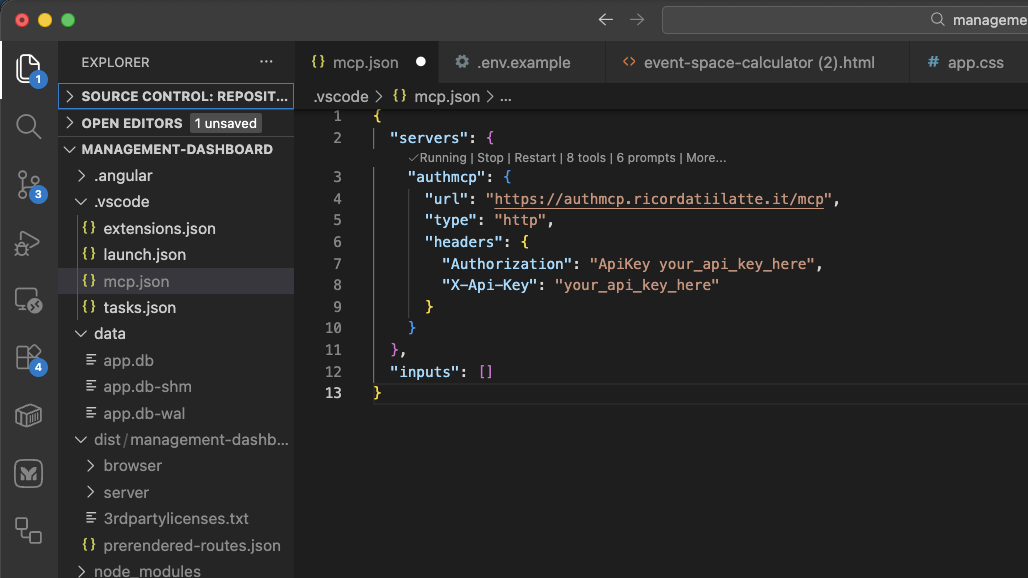
VS Code — awesome-node-auth MCP server connected and ready in Copilot Chat
Create or edit ~/.cursor/mcp.json (global) or .cursor/mcp.json (project-level) and add:
{
  "mcpServers": {
    "awesome-node-auth": {
      "url": "https://mcp.awesomenodeauth.com/mcp",
      "headers": {
        "Authorization": "Bearer YOUR_API_KEY"
      }
    }
  }
}
Replace YOUR_API_KEY with the key you copied in Step 1.
Restart Cursor. The MCP server will appear under Settings → MCP as an active server.
Create or edit ~/.codeium/windsurf/mcp_config.json and add:
{
  "mcpServers": {
    "awesome-node-auth": {
      "serverUrl": "https://mcp.awesomenodeauth.com/mcp",
      "headers": {
        "Authorization": "Bearer YOUR_API_KEY"
      }
    }
  }
}
Replace YOUR_API_KEY with the key you copied in Step 1.
Restart Windsurf. Cascade will now have access to the awesome-node-auth MCP tools.
Edit the Claude Desktop config file:
- macOS:
~/Library/Application Support/Claude/claude_desktop_config.json - Windows:
%APPDATA%\Claude\claude_desktop_config.json
{
  "mcpServers": {
    "awesome-node-auth": {
      "url": "https://mcp.awesomenodeauth.com/mcp",
      "headers": {
        "Authorization": "Bearer YOUR_API_KEY"
      }
    }
  }
}
Replace YOUR_API_KEY with the key you copied in Step 1.
Quit and reopen Claude Desktop. The server will appear in the 🔌 tool icon menu.
In Antigravity open Settings → MCP Servers → Add server and fill in:
| Field | Value |
|---|---|
| Name | node-auth |
| URL | https://mcp.awesomenodeauth.com/mcp |
| Auth header | Authorization: Bearer YOUR_API_KEY |
Replace YOUR_API_KEY with the key you copied in Step 1.
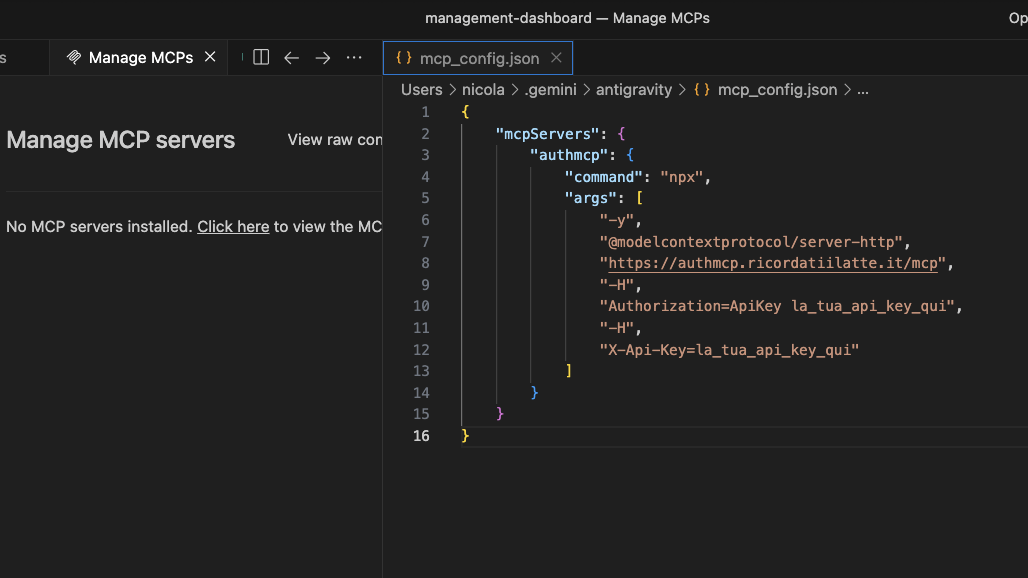
Antigravity — awesome-node-auth MCP server configured
What the AI can configure
Once connected, describe what you need and the AI scaffolds the complete implementation:
| Ask for… | What gets generated |
|---|---|
| "Add JWT auth with Google OAuth" | AuthConfigurator, router(), OAuth strategy config |
| "Add a MongoDB user store" | Full IUserStore implementation with Mongoose |
| "Set up role-based access control" | IRolesPermissionsStore, rbacMiddleware, admin panel wiring |
| "Enable real-time SSE notifications" | AuthEventBus, AuthTools, createToolsRouter with SSE |
| "Add inbound webhooks with vm sandbox" | @webhookAction decorators, ActionRegistry, sandbox config |
| "Create an admin dashboard" | createAdminRouter wiring with all optional stores |
| "Add 2FA with TOTP" | TotpStrategy, QR endpoint, verification flow |
Extra ecosystem documentation in MCP
The MCP server also exposes linked ecosystem READMEs as resources:
awesome-python-auth://docs/readmeawesome-node-auth-flutter://docs/readmeawesome-dart-auth://docs/readmeawesome-rust-auth://docs/readme
Use these when you want AI output aligned with the Python, Flutter, Dart, or Rust sibling projects.
Cross-domain wiki integration
When the MCP server is your auth backend and your documentation wiki (Docusaurus, etc.) lives on a different domain, a few extra settings are needed to make cookies and token refresh work reliably across origins.
Environment variables
# .env — MCP server
CORS_ORIGINS=https://wiki.example.com        # allow the wiki to call the auth API
SITE_URL=https://wiki.example.com            # used for OAuth redirects and email links
Setting CORS_ORIGINS triggers two automatic behaviors in the MCP server:
- Cross-domain cookies —
SameSite=None; Secure=trueis set on all auth cookies automatically (required for cookies to be sent cross-origin). - CORS headers —
Access-Control-Allow-Origin,Access-Control-Allow-Credentials, and preflight handling are added for all listed origins.
Load auth.js in the wiki <head>
Add two script tags to every page of your wiki:
<!-- 1. Load auth.js from the MCP server -->
<script
  src="https://mcp.awesomenodeauth.com/auth/ui/auth.js"
  crossorigin="anonymous"
></script>

<!-- 2. Configure immediately — before any component mounts -->
<script>
  if (window.AwesomeNodeAuth) {
    window.AwesomeNodeAuth.init({
      apiPrefix: 'https://mcp.awesomenodeauth.com/auth',
      headless: true,  // prevents auth.js from doing window.location redirects
    });
  }
</script>
In Docusaurus, add these to scripts (for the <script> blocks) or headTags inside docusaurus.config.ts:
// docusaurus.config.ts
const ACCOUNT_API_ORIGIN = new URL(
  process.env.ACCOUNT_API_URL ?? 'https://mcp.awesomenodeauth.com'
).origin;

const config: Config = {
  // ...
  headTags: [
    {
      tagName: 'script',
      attributes: {
        src: `${ACCOUNT_API_ORIGIN}/auth/ui/auth.js`,
        crossorigin: 'anonymous',
      },
    },
    {
      tagName: 'script',
      innerHTML: `if(window.AwesomeNodeAuth){window.AwesomeNodeAuth.init({apiPrefix:${JSON.stringify(`${ACCOUNT_API_ORIGIN}/auth`)},headless:true});}`,
    },
  ],
};
Why headless: true?
Docusaurus (and other bundler-split SPAs) create multiple isolated JS chunks. Each chunk that imports an authRefresh helper would get its own module-level variable, breaking the singleton pattern and causing duplicate concurrent POST /auth/refresh calls. Because token rotation invalidates the second refresh token, the second call gets a 401 — logging the user out.
auth.js loaded in <head> is a true global (lives on window). All Docusaurus chunks share the same refresh singleton, eliminating the race condition.
headless: true additionally prevents auth.js from performing window.location.href redirects when a session expires — the SPA manages its own navigation.
Selective credentials: 'include'
A common pitfall with global fetch interceptors is that they can break third-party API calls (e.g. to LiteLLM, OpenAI, or Stripe) that use Access-Control-Allow-Origin: *. Browsers block responses with that wildcard header when the request includes credentials.
auth.js avoids this with origin-based matching: it extracts the origin from apiPrefix and adds credentials: 'include' only to requests that go to that same origin. For example, with apiPrefix: 'https://mcp.awesomenodeauth.com/auth', the backend origin is https://mcp.awesomenodeauth.com. Any request to that server — including /mcp/tool or any other path — receives credentials. Requests to https://litellm.external.com or any other domain are left completely untouched.
Built-in AI assistant
Every page of this wiki has an AI Setup button (bottom-right corner). It opens a panel connected directly to the MCP server — ask questions and get code examples without leaving the docs.
Next steps
- Getting Started — install the library and run your first auth route
- Installation & Configuration — full configuration reference
- Advanced features — stores, admin panel, webhooks, SSE, and more